What is
virtualization?
As the name suggests, it is the way to create a virtual instance of any object. In computer science, virtualization can be describe as to make a virtual version of server, storage or operating system. Virtualization of the operating system can be achieved by using virtual box or virtual machine softwares which are freely available on Internet. In this article we will see how to install Oracle Virtual Box on Windows 8 host machine. And after that we will install Ubuntu 14 in virtual box.
So lets get started:
Software required:
1. To download Oracle virtual box:
Choose according to your system.
2. To download Ubuntu:
Ubuntu is freely available. Choose according to your
system.
I downloaded 32 bit despite the fact that I have the 64 bit
system. 64 bit system can run both 32 or 64 bit version. No problem in either
case.
Steps:
A. INSTALLING VIRTUAL BOX:
1. Open the downloaded exe file of virtual box which is of around 115 MB. Click on it. Click yes.

2. Click on install.


Then it will start installing.


Then you see this :


Allow it. Click install. It will start installing again.


3. And it’s done!

B. UBUNTU INSTALLATION IN VIRTUAL BOX
1. Open virtual box:

It looks like this.
Click on NEW blue button on the upper left side.
2. Virtual machine name:
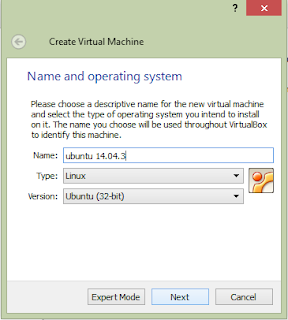
Give name to your virtual machine. I gave Ubuntu 14.04.3. Virtual box will automatically fill the other two options. If you add names like myVirtual or any customized name then you need to specify the other fields. Click on next.

Give name to your virtual machine. I gave Ubuntu 14.04.3. Virtual box will automatically fill the other two options. If you add names like myVirtual or any customized name then you need to specify the other fields. Click on next.
3. Memory size:
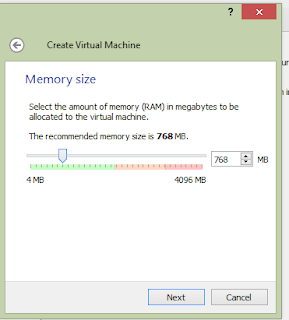

How much memory do you want to give this machine?
It is RAM not secondary memory. I added 768 MB which was
default. You can set according to your system. If your system has 2 GB or less
then reduce it 512 MB or if you have more than 2 like 4,6 or 8 GB, then leave
it as 768 MB.
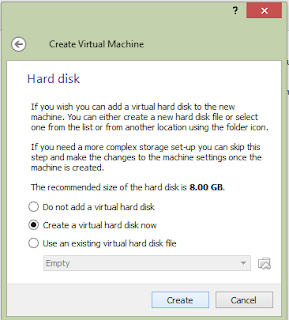
4. Hard Disk: Choose Create a virtual hard disk
now (which is default setting). It creates a virtual hard disk on your machine.

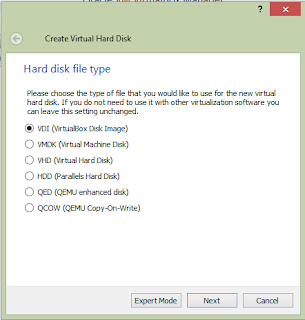
5. Hard disk file type: Choose default setting of Virtual
disk image. Click next.
6. Storage on Physical hard disk: As you work on the virtual machine, you may create files and use storage. So what you need is to access space to store them. This space could be allocated once or you may say that it should do automatically when required. When memory assignment is done dynamically it can grow its size whenever machine needs. It’s good to opt for dynamically allocated option.

6. Storage on Physical hard disk: As you work on the virtual machine, you may create files and use storage. So what you need is to access space to store them. This space could be allocated once or you may say that it should do automatically when required. When memory assignment is done dynamically it can grow its size whenever machine needs. It’s good to opt for dynamically allocated option.

7. File location and size: It’s the size you want to give
your machine. (I gave 15 GB)


8. Select system tab.
Uncheck floppy. Set hard disk first and optical disk second by using arrows.

9. Select processor tab: If you 4 cores then set it to 1 or
more than 4 then set it to 2.Change execution cap to 90%.

10. Switch to display tab. Change the video memory to half
of the available or you can set it to 64 MB.

11. Click on 3d
acceleration check box.

12. Switch to storage
tab. Click on empty. Now select the cd icon which is present on the right side.
Browse the location where you placed iso image of Ubuntu.

13. Click in OK. All settings are done. Click on the start button to start your newly built virtual machine. Virtual Machine will start booting process. It takes time. If you encounter error like ACPI PCC probe failed, do not worry. It is harmless error.

14. Now you see the ubuntu os asking you to install or try
it. Click on try if you want to try it otherwise install button.

15. Click on erase
disk.


16. Select your time zone.

17. Select keyboard layout language:

18. Installation will take time (half an hour or so).


19. Done!!


Thanks for reading. I hope you get, how to do it.


Nice post. I was checking constantly this blog and I am impressed! Extremely helpful information particularly the last part :) I care for such information a lot. I was seeking this particular information for a very long time. Thank you and best of luck. app programmieren berlin
ReplyDeleteWorkday HCM Certification Training
ReplyDeleteMaster Workday HCM modules including staffing models, business processes, payroll, security, and reporting. Get hands-on experience and prepare for certification with practical HR automation scenarios.